2/08/2025

RAG based AI ChatBot


 In this blogpost we are trying to explain how to create RAG (Retrieval-Augmented Generation) ChatBot using Python technologies.


In both diagrams explained, how RAG is working behind the chatbot application.


Key Take Aways


What is an Embedding?

An embedding is a way to represent text, images, or other data as a list of numbers (a vector) so that computers can understand relationships between them. Instead of raw words or sentences, embeddings store meaning in a mathematical format that makes it easier for AI models to process and compare information.


  • In our case we use OpenAI "text-embedding-3-small" mode for data embedding.

What is OpenAI's text-embedding-3-small?

text-embedding-3-small is an embedding model released by OpenAI, optimized for creating vector representations of text.

🔹 Purpose:

  • Converts text into dense vector embeddings, making it easier to perform semantic searches, recommendations, and RAG applications.
  • Smaller and more efficient than larger models, making it great for fast and cost-effective applications.

🔹 How It Works:

  1. Input a text sentence into the model.
  2. The model converts the text into a high-dimensional vector representation (a list of numbers).
  3. These embeddings can then be stored in a vector database for fast similarity searches.

🔹 Use Cases:

  • RAG systems (fetching relevant documents to improve AI responses).
  • Semantic search (finding related content).
  • Clustering and classification (grouping similar documents).
  • Recommendation engines (finding similar items).

What Does "Retrieval" Mean?

Retrieval means finding and fetching relevant information from a source. In AI and computing, retrieval typically refers to searching for and retrieving data from a database, a document store, or the internet to use in answering questions, making recommendations, or improving AI-generated responses.

Vector-Based Retrieval (Used in AI & RAG)

  • Instead of searching for exact keyword matches, vector retrieval finds similar meanings using embeddings (numerical representations of text).
  • Used in semantic search, chatbots, and recommendation systems.

✅ Example:

  • You search "best Italian food" → The system retrieves restaurant reviews related to "pizza", "pasta", and "Italian cuisine", even if they don’t contain the exact words.


What is Augmenting?

Augmenting means adding or enhancing something to improve its quality or functionality. In the context of AI, augmenting usually refers to providing additional information or modifying input data to improve results.

Augmenting Embeddings (Vector-Based AI)

  • Embeddings represent words, sentences, or images as numerical vectors.
  • Augmenting embeddings can involve combining multiple embeddings, adding contextual data, or enriching vectors to improve search and recommendation results.

✅ Example:

  • If you’re building a semantic search engine, you can augment query embeddings with synonyms or extra context to improve search accuracy.


What Does "Generative" Mean?

The term "generative" refers to a system or model that can create (or generate) new content based on learned patterns. In AI, Generative AI refers to models that can generate text, images, music, code, or even videos from a given input.


Generative vs. Traditional AI

🔹 Traditional AI → Analyzes and classifies data (e.g., spam detection, fraud detection).
🔹 Generative AI → Creates new data similar to what it has learned (e.g., ChatGPT, DALL·E).

For example:
✅ A traditional AI model might classify an image as "dog" or "cat."
✅ A generative AI model can create a new image of a dog or cat that has never existed before.


  • In our case we use "gpt-3.5-turbo" LLM model to generate final response.


Explaining Prompting with a RAG Chatbot

A RAG (Retrieval-Augmented Generation) chatbot is an AI assistant that retrieves relevant information from an external knowledge source before generating a response. This helps the chatbot provide more accurate, updated, and fact-based answers.


🔗 How Prompting Works in a RAG Chatbot

Step 1: User Sends a Prompt (Query)

  • The user asks a question.
  • Example:
    "What are the benefits of AI in healthcare?"

Step 2: Retrieval (Fetching Relevant Data)

  • The chatbot searches its document store, database, or vector embeddings for relevant text.
  • It retrieves medical research papers, articles, or previous chatbot conversations about AI in healthcare.

Step 3: Augmentation (Adding Retrieved Data to the Prompt)

  • The chatbot enhances the original prompt by including the retrieved information.
  • Example of an augmented prompt:

    "User asked: 'What are the benefits of AI in healthcare?' Retrieved knowledge: 'AI helps in early disease detection, robotic surgeries, and personalized treatments.' Generate a response based on this information."

Step 4: Generation (AI Creates the Response)

  • The chatbot uses both the prompt and retrieved data to generate a factual and informed response.
  • Example AI response:
    "AI in healthcare provides several benefits, including early disease detection, AI-assisted surgeries, and personalized treatments. For example, AI-powered imaging tools can help detect cancer at an early stage, improving patient outcomes."


**************************  How To Guide  *****************************


Enough of theoury!, let's do some practical stuff 😀


Steps:


1. Create a vector database index in pinecone vector database.

Index name : langchain-doc-index

Then save the PINECONE_API_KEY in .env file.


2. Create an OpenAI account and save the OPENAI_API_KEY in .env file.


3. Create a langsmith account and save the LANGCHAIN_API_KEY in .evn file.


  • You can use google account to sign up for all the three accounts.


Now .env file should be like below.


4. Install Python 3.11


sudo add-apt-repository ppa:deadsnakes/ppa
sudo apt install python3.11
5. Install pip in linux.
 sudo apt install python3-pip
6. Install pipenv
pip install --user pipenv
7. Go to project location and run below command to create pip virtual environment.

$ pipenv --python /usr/bin/python3.11
8. Create Pipfile.lock based on requirements.txt
$ pipenv install
9. Activate project's virtual environment
$ pipenv shell
10. Install dependencies
$ pipenv install urllib3
$ pipenv install langchain_community
$ pipenv install streamlit


11. Run Ingestion module to send embedded data to vector database index.

$ python ingestion.py
This will index scrapped data from langchain documentation, inside below folder


  • If you try to edit single record you can see both text and embedded represenation of a record.


12. Bootup ChatBot UI and ask a question.


$ streamlit run streamlit_app.py


Now we can ask a question.


Now you can see chatbot give an answer from content that we embedded into vector database index.


8/04/2024

A recipe to find technical solutions excluding human factors.


The purpose of this blog post is to find a methodological way to find technical solutions for business requirements and come to a conclusion as a team excluding human factors.


Based on my past experience, I have identified, the key human factor for any successful team is having the right INTENTION. Also there are other human factors as well.

But in reality, It’s a rare situation to have a perfect team in a project/product which works for the same goal. And that’s why in any organization having a methodological way of working is a must then the impact of human factors can be mitigated.


Having a method is like having a recipe, we can get the same results over and over again by following it. Also continuously refining it can lead to getting new foods that we never tried out before.


Therefore the first thing is we need to have a method which needs to continuously evolve and improve.


The next important thing that we need to keep in mind is that business evolves rapidly and to support that, technical solutions also need to evolve at the same speed, which leads to innovation while managing risk.


According to my understanding there are two proven techniques that we can follow. Which are

  1. Fail Fast 

  2. Fail Safe


By applying fail fast, we can validate a solution efficiently without being stuck or stagnate.

Also failing safely will reduce the negative impact to the current business. To achieve fail safe we should be able to do an impact analysis and assess the situation before taking any decision.


Thirdly, once we come to a decision or solution, we should be able to continuously evaluate the outcomes  and find further improvements if necessary.


Lastly we should identify technical principles,guidelines and best practices which align with organizational standards. For instance, there can be different departments , teams, projects or products in the same organization. They might need to follow the same tech stack or different tech stack. As a principal, we find solutions for the problem and architecture and tech stack for that solution. Hence to make sure from problem to tech stack selection propagates to the right direction not vice versa.

Also there is a famous mistake that people often make, which is to try to find a universal solution rather than case by case.

Identifying the right principals will help to find right decisions for solutions.


Let’s try to find a methodology by keeping in mind those four key factors.


Recipe to find a technical solution for a business requirement:


  1. Start with a document and user story. Document everything related to this topic.

Both business and technical teams should have their respective documents and user stories.

  1. Firstly we need to have a clear problem statement in the documents.

  2. Then the business team should evaluate the business impact of having and not having a solution to this problem.

  3. Technical teams should discuss with relevant stakeholders and take all the inputs.

  4. Technical teams can come up with one or few possible solutions and designs to evaluate.


How to evaluate technical design.


  1. Discuss all the concerns. Use technical diagrams as much as possible.

  2. Validate or invalidate those concerns technically. We can find the facts and evidence for those. Finally we can do a POC to get more tangible results.

  3. Practically we won't be able to assess all the concerns at the same time with one POC.

  4. Most of the time we may not be able to find a perfect solution hence we should focus on the result context.

  1. Benefits 2. Drawbacks 3. Issues

      e.  Do a feasible study. Again POC gives more confidence for the team. Additionally we can take the team's technical competency as a factor. Please note that in here don’t take the worst or best case as a base line.

       f. Take previous lessons learnt as inputs for the solution. This can be production issues and solutions provided.


  1. Use open channels and forums for any discussions which help to keep everyone on the same page and less surprises.

  2. Come to a conclusion based on facts and evidence.

Please note, never come to a conclusion purely based on imaginations and assumptions.

  1. Take help and guidance with well experienced colleagues.

  2. Use an iterative approach to implement the solution and later further improve.


  1. Initially apply the solution for one place/problem and continuously evaluate it before going to the next step.


6/15/2023

GitOps Based CICD Pipeline


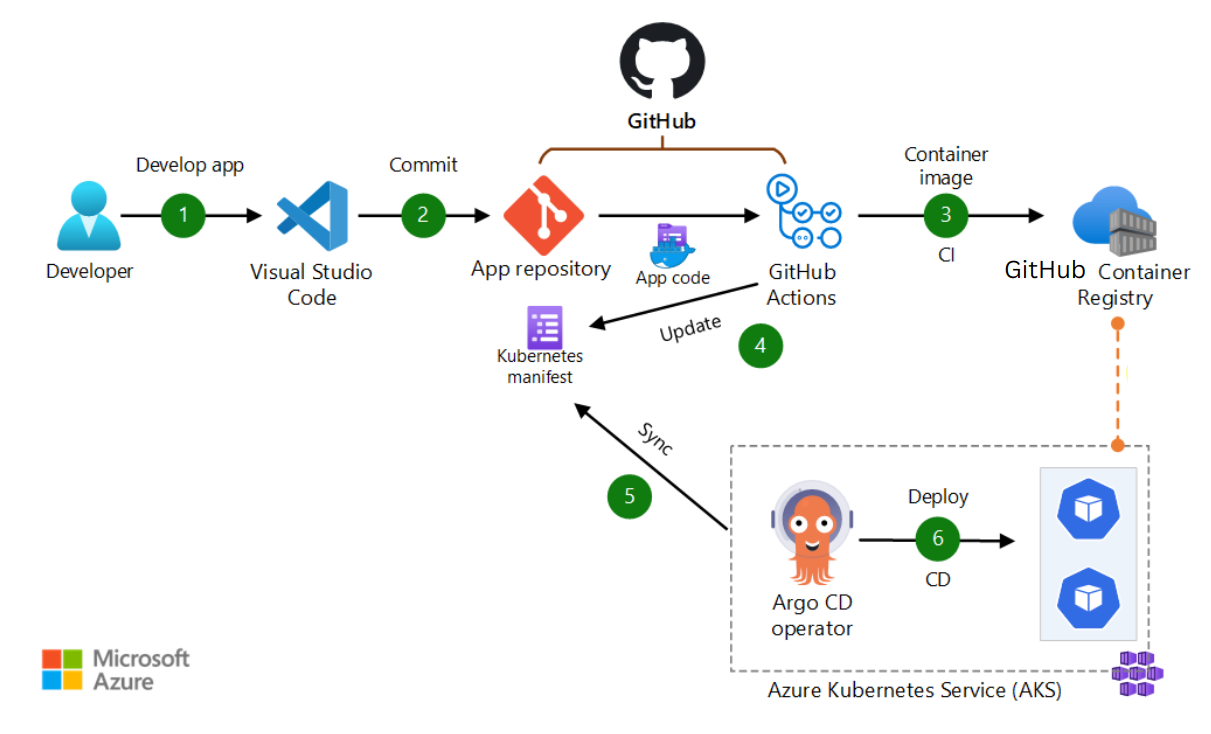
The purpose of this blog post is to explain how to create CI pipeline with GitHub Action and use GitHub Container Registry to publish docker images. Finally we will use ArgoCD for the CD pipeline with Azure AKS cluster.


Note that we have used private GitHub Repositories and Container Registry in this case.


Also please go through this previous blog post to create an AKS cluster.


Here we are using an open source microservice architecture based application called sock-shop.


Prerequisites


  1. Create a GitHub organization; in my case it’s dhanuka-cicd-training .


Creating a new organization from scratch - GitHub Enterprise Server 3.4 Docs


  1. AKS cluster with access permission


  1. Install ArgoCD CLI tool


https://argo-cd.readthedocs.io/en/stable/cli_installation/


  1. Create below two repositories under your organization


https://github.com/dhanuka-cicd-training/multi-cloud-shipping

https://github.com/dhanuka-cicd-training/multi-cloud-shipping-deployment


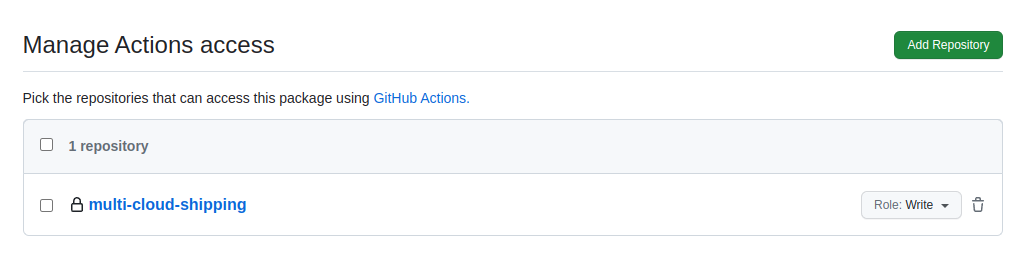
  1. Create a Container Registry for the organization and apply settings as below.


 echo $CR_PAT | docker login ghcr.io -u dhanuka84 --password-stdin

> Login Succeeded


docker push ghcr.io/ORGANIZATION/weaveworksdemos/shipping:0.3.0


Steps


  1. Create a GitHub personal access token with all permissions.


Got to https://github.com/settings/organizations


Then click Developer settings.


Click Tokens classic under Personal tokens.


Generate token


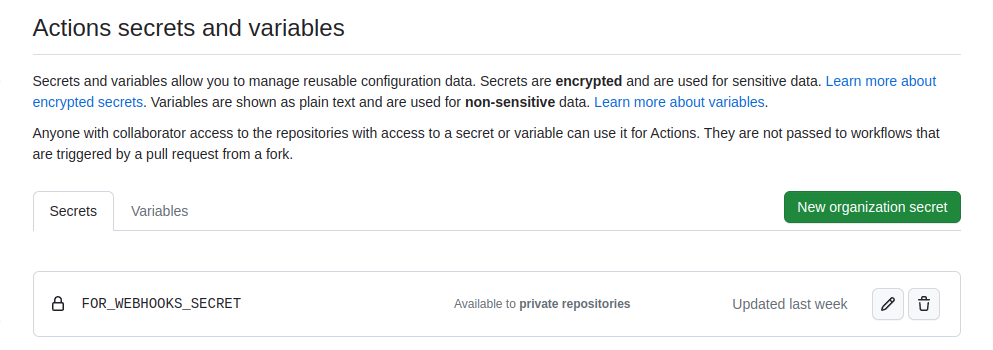
  1. Create a secret called FOR_WEBHOOKS_SECRET


Got to below URL

https://github.com/organizations/YOUR_ORGANIZATION/settings/profile


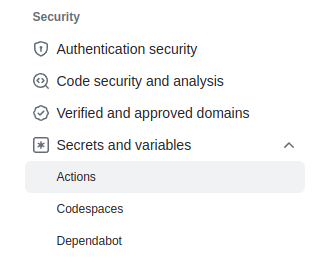
Select Secrets and variables under Security section and then Actions.


Finally create a new organization secret with the value of a personal access token.


  1. Install ArgoCD in the AKS cluster.


Please follow below Microsoft Azure blog post to install ArgoCD in the AKS cluster.

Getting started with GitOps, Argo, and Azure Kubernetes Service - Microsoft Community Hub


  1. Access ArgoCD


Keep these two variables assigned value from kubernetes.

$ export ARGOCD_SERVER=`kubectl get svc argocd-server -n argocd -o json | jq --raw-output '.status.loadBalancer.ingress[0].ip'`


$ export ARGO_PWD=`kubectl -n argocd get secret argocd-initial-admin-secret -o jsonpath="{.data.password}" | base64 -d`


  • Login to ArgoCD 


$ argocd login $ARGOCD_SERVER --username admin --password $ARGO_PWD  --insecure

'admin:login' logged in successfully


  1. Create ArgoCD application


  • Adding Kubernetes context 


$ CONTEXT_NAME=`kubectl config view -o jsonpath='{.current-context}'`


$ argocd cluster add $CONTEXT_NAME


WARNING: This will create a service account `argocd-manager` on the cluster referenced by context `aks-cluster-name-xx` with full cluster level privileges. Do you want to continue [y/N]? 

WARNING: This will create a service account `argocd-manager` on the cluster referenced by context `aks-cluster-name-xx` with full cluster level privileges. Do you want to continue [y/N]? y

INFO[0011] ServiceAccount "argocd-manager" created in namespace "kube-system" 

INFO[0011] ClusterRole "argocd-manager-role" created    

INFO[0012] ClusterRoleBinding "argocd-manager-role-binding" created 

INFO[0017] Created bearer token secret for ServiceAccount "argocd-manager" 

Cluster 'https://aks-cluster-host:443' added


  • Adding GitHub Repository to ArgoCD


argocd repo add https://github.com/dhanuka-cicd-training/multi-cloud-shipping-deployment --username dhanuka84 --password xxx-TOKEN-VALUE


  • Create ArgoCD application with GitHub Repository


argocd app create sock-shop-app --repo https://github.com/dhanuka-cicd-training/multi-cloud-shipping-deployment  --path kustomize/dev --dest-server https://aks-cluster-host:443 --dest-namespace mc-sock-shop


  • Login to GitHub Container Registry with GitHub Token


$ echo $CR_PAT | docker login ghcr.io -u dhanuka84 --password-stdin

> Login Succeeded


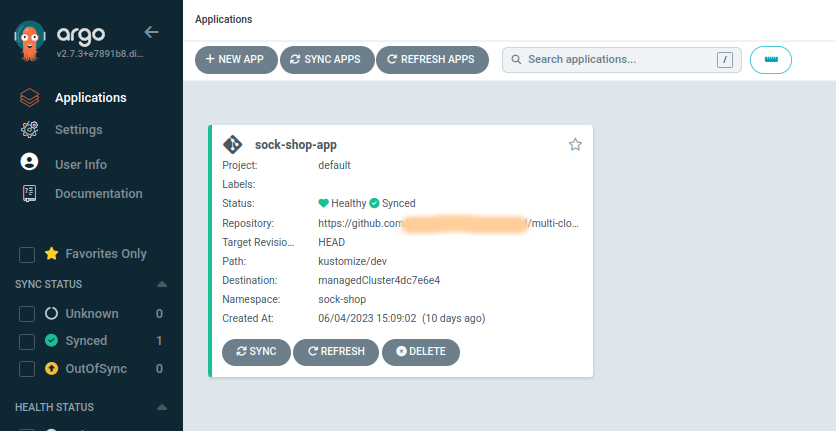
  • Now login into the ArgoCD UI with your selected method ( from previous installation steps ) and go to Applications.


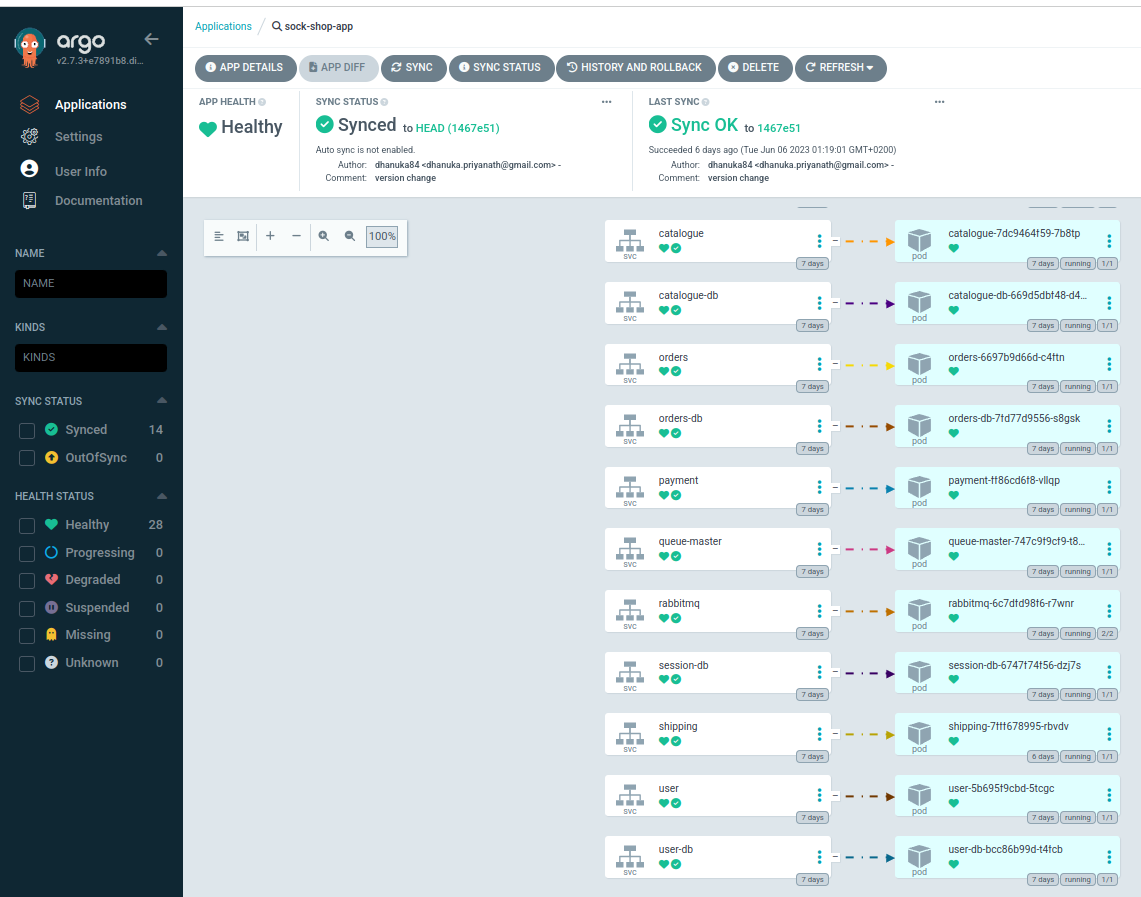
And if you go inside the application you will see the sock-shop application below without Shipping microservice.


  1. Running the CI Pipeline


Clone the https://github.com/dhanuka-cicd-training/multi-cloud-shipping repository and create a new branch called dev.


Then do some edits (README file), and commit changes to the dev branch.


Finally Create a pull request to the main branch in the remote repository.


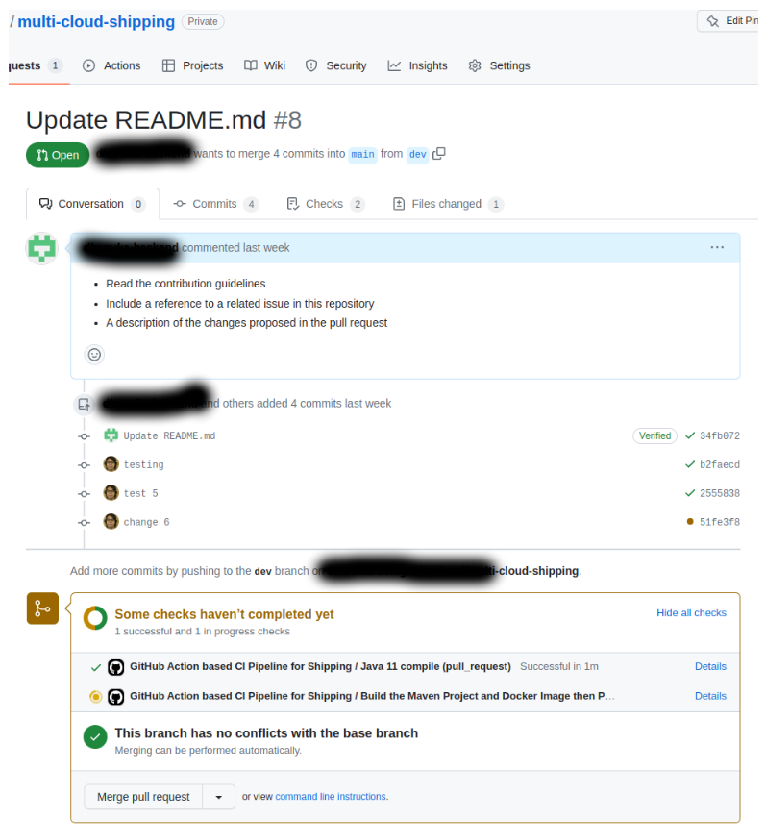
You can see that, when we create a pull request, CI pipeline starts.


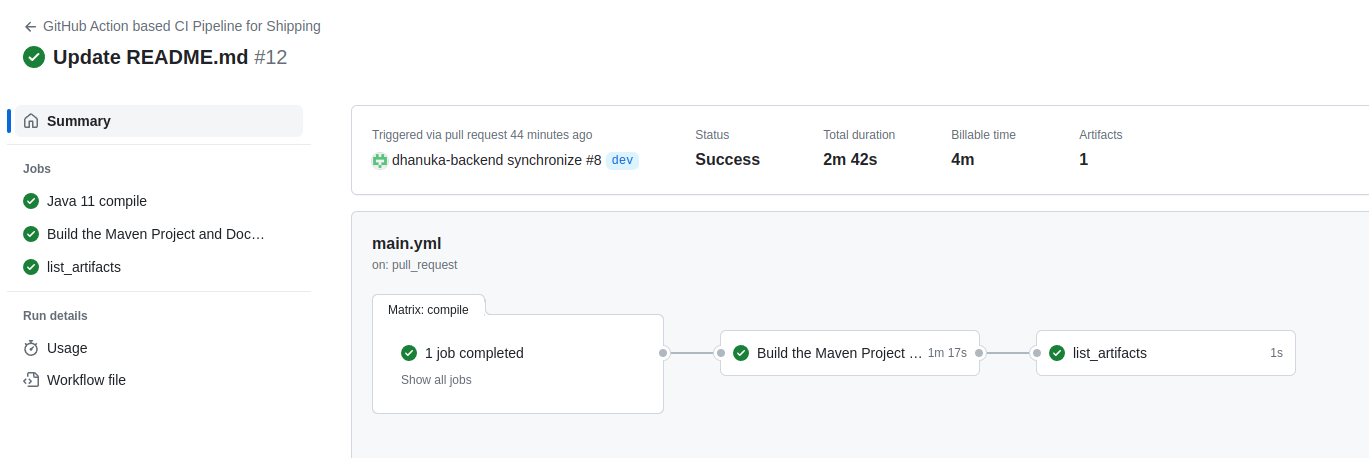
Click details for more information and it will direct you to the CI pipeline.


7. Container Image Registry and Release Management


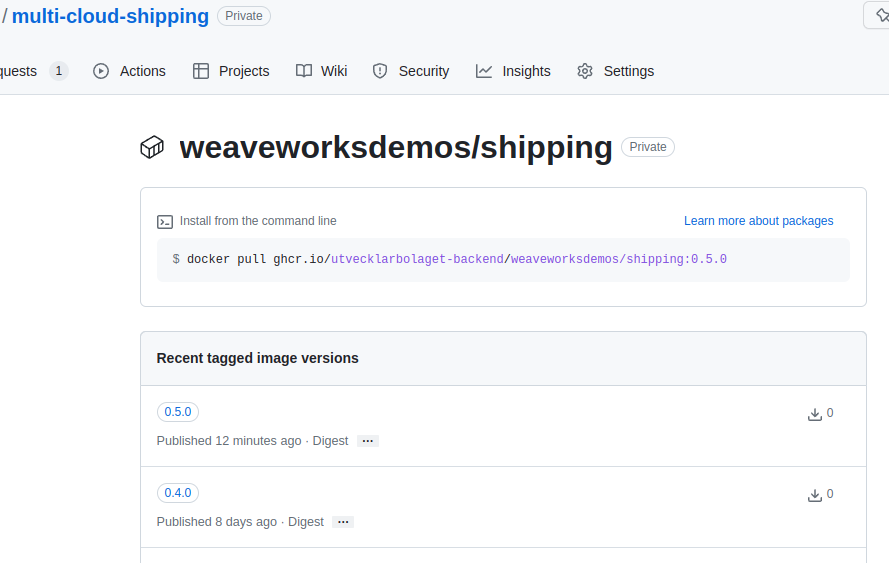
Now if you go to the packages under your organization, you can see the docker image uploaded by CI pipeline.


As you can see, the latest docker image version in my case is 0.5.0.


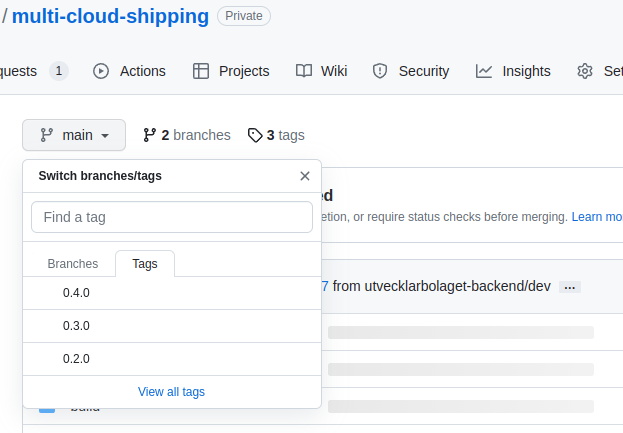
The reason for that is, I have created a tag/release named 0.4.0.


So what happened in the CI pipeline is, the docker image version will be incremented based on the tag version. Please refer to the image below for the tag version.


Now based on the docker image version we need to update that in deployment configuration as below.


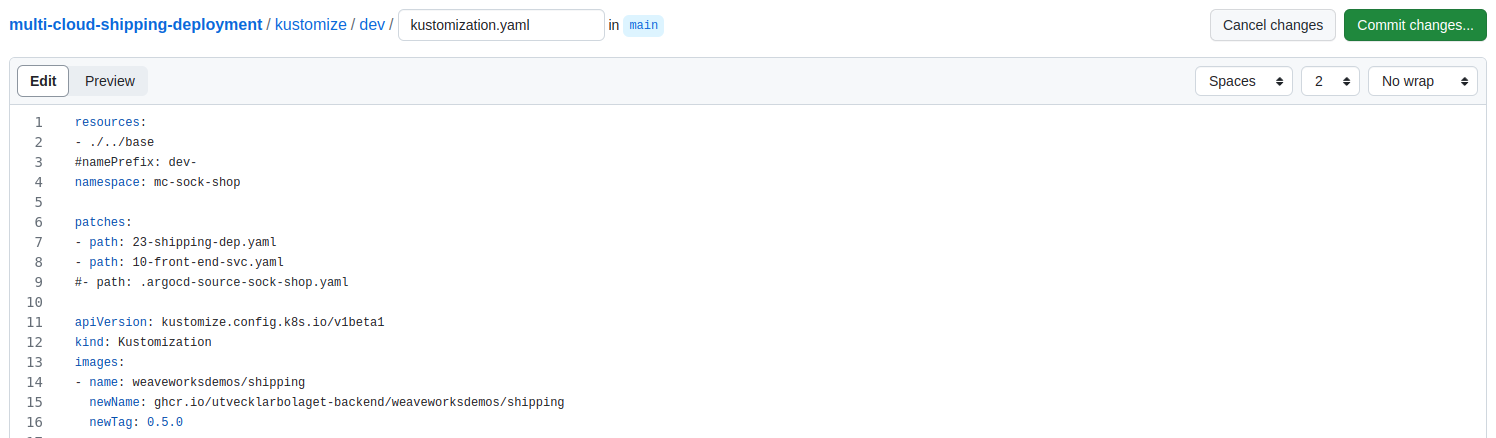
https://github.com/dhanuka-cicd-training/multi-cloud-shipping-deployment/blob/main/kustomize/dev/kustomization.yaml


Update to 0.5.0.


8. Deploying the latest version to Kubernetes.


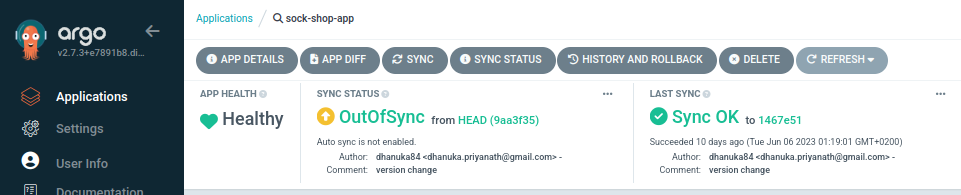
Now if you go to ArgoCD UI, and click the refresh button you can see the deployment is out of synch.


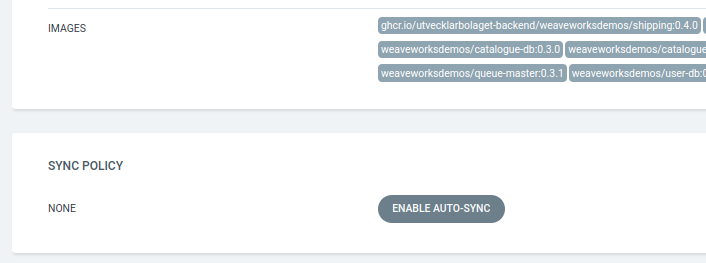
What we can do is, by clicking synch button we can deploy the latest shipping version 0.5.0 or else we can enable auto synch by clicking the App Details.


Also you can see there, the current shipping version is 0.4.0.


Let’s synch the changes.


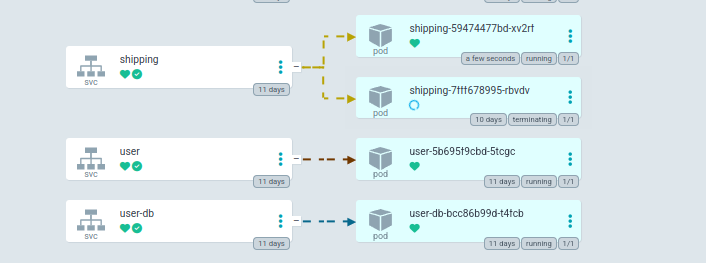
You can see, latest shipping pod is deploying while the old one is terminating.


Now once you click the APP Details, you can see the latest image of shipping.