12/18/2017

Anatomy of Micro services based & distributed Master Data Management Architecture


Please note this is improved version of previously[1] explained architecture.

Master Data Change Detection

  1. Admin Panel will change or add master data.
  2. Changes goes to DB.
  3. Update Hibernate First Level Cache.
  4. Distribute data via Kafka.
  5. Kafka Consumer detect master data change notification.
  6. Update Hazelcast Distributed map with which master data has been changed.
  7. Scheduler application task read from HZ map and get to know about which master data changed.
  8. Get latest data for changed master data from master data micro service.
  9. Update LocalEntityMap with business key and Entity.
  10. Update Business key to Primary key map.
  11. Removed master data notification record from HZ distributed map.


Scheduler Application Load Balancing

  1. Get Business key to primary key mapping to all master data.
  2. Update Business key to primary key mapping
  3. Read Business key to primary key map then load balanced among HZ cluster members.
  4. update HZ distributed map.
  5. Keep business keys which load balanced to local application node.


Processing using master data within scheduler task

  1. Read from HZ distributed map and get master data local to this node for processing and Keep them for processing.
  2. Take business keys to process.
  3. Get locally cached master data for business keys for processing.
  4. If can’t find in the cache get from micro service.

10/05/2017

Simple explanation about basic machine learning algorythms with R

Supervised   

Supervised learning is where you have input variables (x) and an output variable (Y) and you use an algorithm to learn the mapping function from the input to the output.
Y = f(X)
The goal is to approximate the mapping function so well that when you have new input data (x) that you can predict the output variables (Y) for that data.

Regression vs Classification   

Regression is used to predict continuous values. Classification is used to predict which class a data point is part of (discrete value).
                           

Regression


In the case of regression, the target variable is continuous — meaning that it can take any value within a specified range. Input variables, on the other hand, can be either discrete or continuous.

Linear Regression


Math:
SepalLength = a * PetalWidth + b* PetalLength +c

Code:

# Load required packages
library(ggplot2)
# Load iris dataset
data(iris)
# Have a look at the first 10 observations of the dataset
head(iris)
# Fit the regression line
fitted_model <- lm(Sepal.Length ~ Petal.Width + Petal.Length, data = iris)
# Get details about the parameters of the selected model
summary(fitted_model)
# Plot the data points along with the regression line
ggplot(iris, aes(x = Petal.Width, y = Petal.Length, color = Species)) +
 geom_point(alpha = 6/10)  +
 stat_smooth(method = "lm", fill="blue", colour="grey50", size=0.5, alpha = 0.1)


Rplot.png


Logistic Regression


The difference is that the regression line is not straight anymore.

Math:

Y=g(a*X1+b*X2)

...where g() is the logistic function.

Code:

# Load required packages
library(ggplot2)
# Load data
data(mtcars)
# Keep a subset of the data features that includes on the measurement we are interested in
cars <- subset(mtcars, select=c(mpg, am, vs))
# Fit the logistic regression line
fitted_model <- glm(am ~ mpg+vs, data=cars, family=binomial(link="logit"))
# Plot the results
ggplot(cars, aes(x=mpg, y=vs, colour = am)) + geom_point(alpha = 6/10) +
 stat_smooth(method="glm",fill="blue", colour="grey50", size=0.5, alpha = 0.1, method.args=list(family="binomial"))


Rplot01.png

Decision Trees (Classification or Regression)


What they basically do is draw a “map” of all possible paths along with the corresponding result in each case.

Based on a tree like this, the algorithm can decide which path to follow at each step depending on the value of the corresponding criterion.

Code:

# Include required packages
#install.packages("party")
#install.packages("partykit")

library(party)
library(partykit)
# Have a look at the first ten observations of the dataset
print(head(readingSkills))
input.dat <- readingSkills[c(1:105),]
# Grow the decision tree
output.tree <- ctree(
 nativeSpeaker ~ age + shoeSize + score,
 data = input.dat)
# Plot the results
plot(as.simpleparty(output.tree))


Rplot02.png

Unsupervised

Unsupervised learning is where you only have input data (X) and no corresponding output variables.

The goal for unsupervised learning is to model the underlying structure or distribution in the data in order to learn more about the data.

These are called unsupervised learning because unlike supervised learning above there is no correct answers and there is no teacher. Algorithms are left to their own devises to discover and present the interesting structure in the data.
   

Clustering


With clustering, if we have some initial data at our disposal, we want to form groups so that the data points belonging to some group are similar and are different from data points of the other groups , such as grouping customers by purchasing behavior..

Algorythm :

  1. Initialization step: For k=3 clusters, the algorithm randomly selects three points as centroids for each cluster.
  2. Cluster assignment step: The algorithm goes through the rest of the data points and assigns each one of them to the closest cluster.
  3. Centroid move step: After cluster assignment, the centroid of each cluster is moved to the average of all points belonging to the cluster.
Steps 2 and 3 are repeated multiple times until there is no change to be made regarding cluster assignments.


Code:

# Load required packages
library(ggplot2)
library(datasets)
# Load data
data(iris)
# Set seed to make results reproducible
set.seed(20)
# Implement k-means with 3 clusters
iris_cl <- kmeans(iris[, 3:4], 3, nstart = 20)
iris_cl$cluster <- as.factor(iris_cl$cluster)
# Plot points colored by predicted cluster
ggplot(iris, aes(Petal.Length, Petal.Width, color = iris_cl$cluster)) + geom_point()

Rplot03.png

Colored by Species


Code:

# Load required packages
library(ggplot2)
library(datasets)
# Load data
data(iris)
# Set seed to make results reproducible
set.seed(20)
# Implement k-means with 3 clusters
iris_cl <- kmeans(iris[, 3:4], 3, nstart = 20)
iris_cl$cluster <- as.factor(iris_cl$cluster)
# Plot points colored by predicted cluster
ggplot(iris, aes(Petal.Length, Petal.Width, color = iris$Species)) + geom_point()

Rplot04.png

Association


An association rule learning problem is where you want to discover rules that describe large portions of your data, such as people that buy X also tend to buy Y.

References:


7/30/2017

Sending Logs to ELK Stack through Logback


Sample Kibana Dashboard


Pre-Requirements & Steps to Setup

1. Java Application which already configured with Logback as Logging manager and use Groovy to configure Logback.

Sample Java Start up script 

java \
-Xms512m -Xmx1024m \
-XX:+HeapDumpOnOutOfMemoryError \
-XX:HeapDumpPath="/home/uranadh/opensource/kafka_connect_config/heap-dump.hprof" \
-cp "distributed-services-1.0.0.jar:lib/*" \
 -Dlogback.configurationFile=/home/uranadh/opensource/kafka_connect_config/logback.groovy  \
 org.reactor.monitoring.application.internal.Member

2. Configure logback.groovy file with Logstash Appender.

Please note here we use below Logstash  TCP Appender.

https://github.com/logstash/logstash-logback-encoder#pattern-json-provider

Groovy file


import ch.qos.logback.classic.AsyncAppender;
import ch.qos.logback.classic.encoder.PatternLayoutEncoder;
import ch.qos.logback.core.FileAppender;

import static ch.qos.logback.classic.Level.DEBUG;
import static ch.qos.logback.classic.Level.INFO;

import org.slf4j.LoggerFactory;
import ch.qos.logback.classic.Level;
import ch.qos.logback.classic.Logger;
import ch.qos.logback.core.rolling.RollingFileAppender;
import ch.qos.logback.core.rolling.TimeBasedRollingPolicy;
import ch.qos.logback.core.util.FileSize;
import net.logstash.logback.appender.LogstashTcpSocketAppender
import net.logstash.logback.encoder.LogstashEncoder


appender("STASH", LogstashTcpSocketAppender) {
  println "Setting [destination] property to 127.0.0.1:5000"
  destination =  "127.0.0.1:5000" 
  encoder(LogstashEncoder) {
   
  }
}

appender("ASYNC", AsyncAppender) {
  discardingThreshold=0;
  queueSize=500;
  neverBlock=true;
  appenderRef("STASH");
}

//root(DEBUG, ["ASYNC"])
root(INFO, ["ASYNC"])

logger("org.reactor.monitoring", DEBUG,["STASH"],false)

 3. Install ElasticSearch & Run

https://www.elastic.co/downloads/elasticsearch

elasticsearch-5.5.0/bin$ ./elasticsearch


 4. Install, Configure & Run Logstash


https://www.elastic.co/guide/en/logstash/current/installing-logstash.html

 Sample Logstash Configuration- logstash-filter.conf


input { 
  tcp {
   port => 5000
   codec => "json"
  }
}

filter {
  grok {
    match => { "message" => "%{COMBINEDAPACHELOG}" }
  }
  date {
    match => [ "timestamp" , "dd/MMM/yyyy:HH:mm:ss Z" ]
  }
}

output {
  elasticsearch { hosts => ["localhost:9200"]
          index => "dlogs-%{+YYYY.MM.dd}"
          document_type => "log"
           
         }
  stdout { codec => rubydebug }
}

Run Logstash

logstash-5.5.1$ bin/logstash -f logstash-filter.conf


Sample Console Output

{
     "@timestamp" => 2017-07-30T15:28:37.792Z,
          "level" => "INFO",
           "port" => 52778,
    "thread_name" => "hz.ShutdownThread",
    "level_value" => 20000,
       "@version" => 1,
           "host" => "127.0.0.1",
    "logger_name" => "com.hazelcast.core.LifecycleService",
        "message" => "[10.180.35.234]:8701 [hibernate] [3.7.3] [10.180.35.234]:8701 is SHUTDOWN",
           "tags" => [
        [0] "_grokparsefailure"
    ]
}


 5. Insall & Run Kibana

https://www.elastic.co/guide/en/kibana/current/install.html

kibana-5.5.1-linux-x86_64$ ./bin/kibana 

6. Go to Kibana Dashboard

http://localhost:5601/app/kibana#/discover?_g=(refreshInterval:(display:Off,pause:!f,value:0),time:(from:now-15m,mode:quick,to:now))&_a=(columns:!(_source),index:'dlogs-*',interval:auto,query:(query_string:(analyze_wildcard:!t,query:'*')),sort:!('@timestamp',desc))


6/23/2017

Master Data Management for Distributed Applications


Requirement Criteria

1. Self Load Balancing.

There are 100 products and those products need to be processed by each node without duplicating.

Example:


There are two nodes which need to process all the products as 50 products each at a time. So Node A will process 50 products while Node B will process remains 50 products.


2. High Availability and Fault Tolerant

If one node goes down remains should process all the products.

Example:

Let's say out of two nodes one nodes crashed so remain other node need to process all the 100 products until crashed node get recover.

3. Local (L1 cache) cache should be maintained by each node.

By doing this we can save unwanted round trips to Database for master data reading. Same time each node only need few Database connections to get master data from centralized DB. This is a micro services friendly approach when you use centralized DB for master data management.

4. Once master data got changed that should be reflected (synched) in each Local Cache.

Each node should process with latest data.

5. Distributed Map should maintain bare minimum information within its cache.

This will help to maintain performance and stability of distributed Map.


Architecture Explained

1. We used Hazelcast as a distributed in memory cache.

Using hazelcast distributed map we share all the products among the nodes.

2. Again we use Hazelcast for application clustering so each node will act as hazelcast cluster node. All the cluster communication and cluster management will done by hazelcast itself.

3. We used Hibernate as an ORM tool.

Hibernate Session act as a Local Cache so basically we just have to use it's API for L1 cache management.

4. In here Kafka act as data pipeline for the whole architecture.

So once master data got changed by Node.JS admin panel it will be sent to Kafka as a JSON.


Node which enabled DB write permission will update DB with necessary changes and same time update Distributed map with business key and primary key.


5. Each hazelcast cluster node acting as a consumer for Kafka under different consumer group.

Hazelcast Cluster == Kafka Consumer Group

So one of cluster member which disabled DB write permission will consume same JSON and updated relevant distributed map with master data record business key and primary key. By doing that rest of the members in the same consumer group (cluster) will get to know the changes and updated their L1 cache after reading changes from DB.

4/09/2017

System (Business/Customer) Integration === Data Integration

Below you can see, high level architectures of my favorite Enterprise class IT projects which involved system integration heavily.

You can get some idea about how integration evolve with technologies & architecture.


4/06/2017

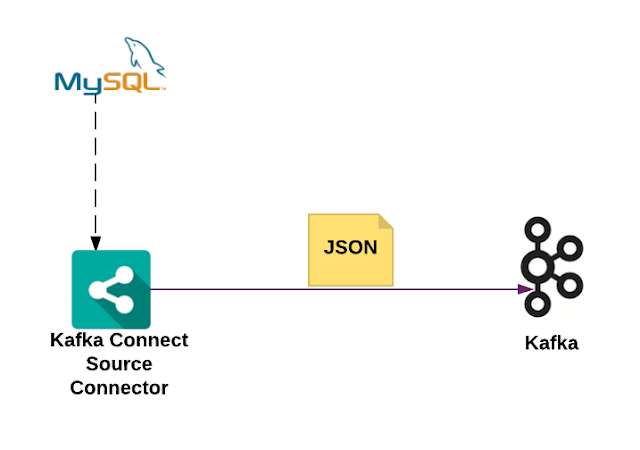
Replicate Table Data from MySQL to Kafka


Steps

1. Download and install Confluent 3.2.0

2. cd  ~/software/confluent-3.2.0

3.  Start Zookeeper

nohup ./bin/zookeeper-server-start ./etc/kafka/zookeeper.properties &

4. Start Kafka

nohup ./bin/kafka-server-start ./etc/kafka/server.properties > kafka.log 2>&1 &

5. Create & Configure JDBC connector properties

touch etc/kafka-connect-jdbc/source-mysql.properties
vim etc/kafka-connect-jdbc/source-mysql.properties

name=mysql-source
connector.class=io.confluent.connect.jdbc.JdbcSourceConnector
tasks.max=10

connection.url=jdbc:mysql://localhost:3306/hibernateDB?user=root&password=root
mode=bulk
#mode=timestamp+incrementing
#timestamp.column.name=modified
#incrementing.column.name=id

topic.prefix=mysql


6. Copy mysql driver to kafka connect

cp mysql-connector-java-5.1.40.jar share/java/kafka-connect-jdbc/

7. Start JDBC Source Connector

nohup ./bin/connect-standalone etc/kafka/connect-standalone.properties  etc/kafka-connect-jdbc/source-mysql.properties  > jdbc.log 2>&1 &


Verify

mysql> show tables;
+-----------------------+
| Tables_in_hibernateDB |
+-----------------------+
| LOCATION              |
| PRODUCT               |
| TEST                  |
| TEST_LOCATION         |
+-----------------------+


mysql> desc LOCATION;
+---------------+--------------+------+-----+---------+----------------+
| Field         | Type         | Null | Key | Default | Extra          |
+---------------+--------------+------+-----+---------+----------------+
| ID            | bigint(20)   | NO   | PRI | NULL    | auto_increment |
| VERSION       | bigint(20)   | NO   |     | NULL    |                |
| LOCATION_NAME | varchar(255) | NO   | UNI | NULL    |                |
+---------------+--------------+------+-----+---------+----------------+


List Down topics
bin/kafka-topics --list --zookeeper localhost:2181

mysqlLocation
mysqlProduct
mysqlTest
mysqlTest_Location

View Topic Messages 
 
./bin/kafka-console-consumer  --zookeeper localhost:2181 --from-beginning --topic mysqlLocation

{"schema":{"type":"struct","fields":[{"type":"int64","optional":false,"field":"ID"},{"type":"int64","optional":false,"field":"VERSION"},{"type":"string","optional":false,"field":"LOCATION_NAME"}],"optional":false,"name":"LOCATION"},"payload":{"ID":2,"VERSION":0,"LOCATION_NAME":"Denver"}}
{"schema":{"type":"struct","fields":[{"type":"int64","optional":false,"field":"ID"},{"type":"int64","optional":false,"field":"VERSION"},{"type":"string","optional":false,"field":"LOCATION_NAME"}],"optional":false,"name":"LOCATION"},"payload":{"ID":4,"VERSION":0,"LOCATION_NAME":"Boston"}}


3/25/2017

Kafka Connect Architecture


  • Please note here I am using confluent platform. So please go to confluent installation directory and run below kafka related commands. For example mine:

/home/xxx/software/confluent-3.0.0


Steps to follow:


1. Start ElasticSearch

$ cd ~/software/elasticsearch-2.3.4/

./bin/elasticsearch

2. Start Zookeeper
nohup ./bin/zookeeper-server-start ./etc/kafka/zookeeper.properties &

3. Start Kafka
nohup ./bin/kafka-server-start ./etc/kafka/server.properties > kafka.log 2>&1 &

4. Start Standalone Source connector
nohup ./bin/connect-standalone etc/kafka/connect-standalone.properties etc/kafka/connect-socket-source.properties  > socket.log 2>&1 &
5. Start Distributed Sink connector
nohup ./bin/connect-distributed etc/kafka/connect-distributed.properties  > connect.log 2>&1 &
6. Create topics names event_topic and metric_topic
bin/kafka-topics --create --zookeeper localhost:2181 --replication-factor 1 --partitions 2 --topic event_topic

bin/kafka-topics --create --zookeeper localhost:2181 --replication-factor 1 --partitions 2 --topic metric_topic

7. List down created topics
bin/kafka-topics --list --zookeeper localhost:2181

8. Start console consumer to verify source connector workflow
./bin/kafka-console-consumer  --zookeeper localhost:2181 --from-beginning --topic event_topic

9. Create index called “event_topic” in ElasticSearch
$ curl -XPUT 'http://localhost:9200/event_topic/' -d '{
   "settings" : {
       "number_of_shards" : 3,
       "number_of_replicas" : 2
   }
}'
10. Just in case if you want to delete topics

bin/kafka-topics --delete --zookeeper localhost:2181 --topic EVENT_TOPIC

bin/kafka-topics --delete --zookeeper localhost:2181 --topic METRIC_TOPIC
11. Create sink connector through rest service

curl -X POST -H "Content-Type: application/json" --data '{"name": "elasticsearch-sink", "config": {"connector.class":"io.confluent.connect.elasticsearch.ElasticsearchSinkConnector", "tasks.max":"2","batch.size":1,"key.ignore":"true","connection.url":"http://localhost:9200","topics":"socket-test,event_topic,metric_topic","schema.ignore":"true","topic.index.map":"event_topic:event_topic,metric_topic:metric_topic","linger.ms":1000,"topic.schema.ignore":"event_topic,metric_topic" }}’ http://localhost:8084/connectors
12. Reconfigure sink connector on the fly.


curl -X PUT -H "Content-Type: application/json" --data '{"connector.class":"io.confluent.connect.elasticsearch.ElasticsearchSinkConnector", "tasks.max":"2","batch.size":1,"key.ignore":"true","connection.url":"http://localhost:9200","topics":"socket-test,event_topic,metric_topic","schema.ignore":"true","topic.index.map":"event_topic:event_topic,metric_topic:metric_topic","linger.ms":1000,"topic.schema.ignore":"event_topic,metric_topic","type.name":"kafka-connect" }’ http://localhost:8085/connectors/elasticsearch-sink/config

13. Create Source connector


curl -X POST -H "Content-Type: application/json" --data '{"name": "socket-connector", "config": {"connector.class":"org.apache.kafka.connect.socket.SocketSourceConnector", "tasks.max":"4", "topic":"socket-test", "schema.name":"socketschema","type.name":"kafka-connect","schema.ignore":"true", "port":"12345", "batch.size":"2" }}' http://localhost:8084/connectors

14. Reconfigure Source connector on the fly


curl -X PUT -H "Content-Type: application/json" --data '{"connector.class":"org.apache.kafka.connect.socket.SocketSourceConnector",
"tasks.max":"4", "topics":"socket-test",
"schema.name":"socketschema",
"type.name":"kafka-connect",
"schema.ignore":"true",
"tcp.port":"12345",
"batch.size":"2",
"metrics_id":"domain",
"metrics_domains":"",
"events_domains":"",
"domain_topic_mapping":"event_sum:event_topic,metric_rum:metric_topic",
"error_topic":"error_topic"

15. Send a sample json message

cat samplejson | netcat localhost 12345

16. Verify json message from ElasticSearch


17. Kafka Connect configuration

Connect-distributed.properties

##
# Licensed to the Apache Software Foundation (ASF) under one or more
# contributor license agreements.  See the NOTICE file distributed with
# this work for additional information regarding copyright ownership.
# The ASF licenses this file to You under the Apache License, Version 2.0
# (the "License"); you may not use this file except in compliance with
# the License.  You may obtain a copy of the License at
#
#    http://www.apache.org/licenses/LICENSE-2.0
#
# Unless required by applicable law or agreed to in writing, software
# distributed under the License is distributed on an "AS IS" BASIS,
# WITHOUT WARRANTIES OR CONDITIONS OF ANY KIND, either express or implied.
# See the License for the specific language governing permissions and
# limitations under the License.
##

# These are defaults. This file just demonstrates how to override some settings.
bootstrap.servers=localhost:9092

# unique name for the cluster, used in forming the Connect cluster group. Note that this must not conflict with consumer group IDs
group.id=connect-cluster

# The converters specify the format of data in Kafka and how to translate it into Connect data. Every Connect user will
# need to configure these based on the format they want their data in when loaded from or stored into Kafka
key.converter=org.apache.kafka.connect.storage.StringConverter
value.converter=org.apache.kafka.connect.storage.StringConverter

#key.converter=io.confluent.connect.avro.AvroConverter
#value.converter=io.confluent.connect.avro.AvroConverter
# Converter-specific settings can be passed in by prefixing the Converter's setting with the converter we want to apply
# it to
key.converter.schemas.enable=false
value.converter.schemas.enable=false

# The internal converter used for offsets and config data is configurable and must be specified, but most users will
# always want to use the built-in default. Offset and config data is never visible outside of Kafka Connect in this format.
internal.key.converter=org.apache.kafka.connect.json.JsonConverter
internal.value.converter=org.apache.kafka.connect.json.JsonConverter
internal.key.converter.schemas.enable=false
internal.value.converter.schemas.enable=false

# Topic to use for storing offsets. This topic should have many partitions and be replicated.
offset.storage.topic=connect-offsets

# Topic to use for storing connector and task configurations; note that this should be a single partition, highly replicated topic.
# You may need to manually create the topic to ensure single partition for the config topic as auto created topics may have multiple partitions.
config.storage.topic=connect-configs

# Topic to use for storing statuses. This topic can have multiple partitions and should be replicated.
status.storage.topic=connect-status

# Flush much faster than normal, which is useful for testing/debugging
offset.flush.interval.ms=10000
rest.port=8085


Connect-standalone.properties

# Licensed to the Apache Software Foundation (ASF) under one or more
# contributor license agreements.  See the NOTICE file distributed with
# this work for additional information regarding copyright ownership.
# The ASF licenses this file to You under the Apache License, Version 2.0
# (the "License"); you may not use this file except in compliance with
# the License.  You may obtain a copy of the License at
#
#    http://www.apache.org/licenses/LICENSE-2.0
#
# Unless required by applicable law or agreed to in writing, software
# distributed under the License is distributed on an "AS IS" BASIS,
# WITHOUT WARRANTIES OR CONDITIONS OF ANY KIND, either express or implied.
# See the License for the specific language governing permissions and
# limitations under the License.

# These are defaults. This file just demonstrates how to override some settings.
bootstrap.servers=localhost:9092

# The converters specify the format of data in Kafka and how to translate it into Connect data. Every Connect user will
# need to configure these based on the format they want their data in when loaded from or stored into Kafka
#key.converter=org.apache.kafka.connect.json.JsonConverter
#value.converter=org.apache.kafka.connect.json.JsonConverter

key.converter=org.apache.kafka.connect.storage.StringConverter
value.converter=org.apache.kafka.connect.storage.StringConverter

#key.converter=org.apache.kafka.connect.json.JsonConverter
#value.converter=org.apache.kafka.connect.json.JsonConverter
# Converter-specific settings can be passed in by prefixing the Converter's setting with the converter we want to apply
# it to
key.converter.schemas.enable=false
value.converter.schemas.enable=false

# The internal converter used for offsets and config data is configurable and must be specified, but most users will
# always want to use the built-in default. Offset and config data is never visible outside of Kafka Connect in this format.
internal.key.converter=org.apache.kafka.connect.json.JsonConverter
internal.value.converter=org.apache.kafka.connect.json.JsonConverter
internal.key.converter.schemas.enable=false
internal.value.converter.schemas.enable=false

offset.storage.file.filename=/tmp/connect.offsets
# Flush much faster than normal, which is useful for testing/debugging
offset.flush.interval.ms=10000
rest.port=8084